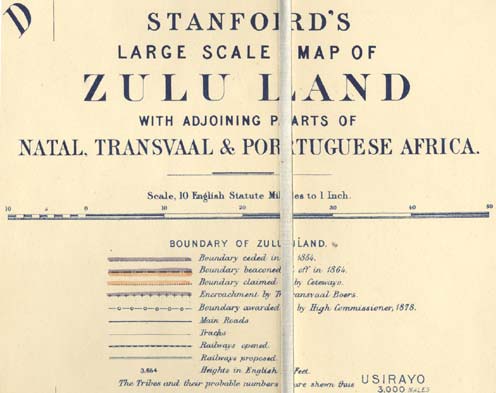
STANFORD’S / LARGE SCALE MAP / OF ZULU LAND / WITH ADJOINING PARTS OF / NATAL, TRANSVAAL & PORTUGUESE AFRICA. [4d] Stanford’s Geog.r Estab.t London. [5e, ob] London: Published by Edward Stanford, 55, Charing Cross, S.W. March 4.th 1879. [3e, ob]
[cover label] STANFORD’S / LARGE SCALE MAP / OF ZULU LAND / WITH ADJOINING PARTS OF / NATAL, TRANSVAAL & PORTUGUESE AFRICA. / [rule]
LONDON: / EDWARD STANFORD, 55, Charing Cross. Lithographic transfer, dissected and laid on canvas, folded in original covers, with original label, and a three page description ‘NOTES ON The PHYSICAL FEATURES AND POPULATION OF ZULULAND TO ACCOMPANY STANFORD’S LARGE SCALE MAP …’, totalling approximately 820 x 595mm

Background
In 1873, Cetywayo became absolute ruler of the Zulu nation on the death of his father, Panda. Cetywayo, a very able king, revived the military methods of his uncle, Chaka, who had established the Zulu’s military pre-eminence in the region. During Cetywayo’s reign there was increasing conflict with Transvaal over boundaries disputes. When Britain annexed the Transvaal in 1877 Britain became took over Transvaal’s claims. The British High Commissioner felt that Zulu power needed to be reined in, and in December 1878 the Zulus were ordered to accept a British resident commissioner. Cetywayo ignored the deadline, and in January 1879 a British Army led by Lord Chelmsford, invaded Zululand.
Lord Chelmsford divided his force into three columns, with the objective of marching on the royal kraal, Ulundi. Chelmsford took personal command of the central column, which marched to Rorke’s Drift where a small garrison was left, before continuing on towards Ulundi. On the night of January 21st the central column camped at Isandhlwana. The following morning, the 22nd, Chelmsford led a small reconnoitring party out of the camp and thus completely missed the first battle of the war!
Shortly after he left a Zulu army of about 10,000 men arrived and launched an immediate attack, catching the camp by surprise. The King’s West African Rifles, a native regiment about to bear the brunt of the attack, turned and ran, allowing the Zulus within the camp. In the ensuing slaughter virtually every British soldier was killed.
Several Zulu impis (about 4,000 men) then continued to Rorke’s Drift and, the same afternoon, launched a ferocious assault on its small garrison there. This composed 80 men from the 24th Regiment of Foot commanded by an officer of the Royal Engineers, and about 40 men in the hospital. At dawn on the 23rd the Zulus – who had broken into the camp six times but were driven out each time – abandoned the attack. The attackers lost about 350 dead, the defenders 17! Later that day, Chelmsford and his party, having found the aftermath of Isandhlwana, arrived at Rorke’s Drift. Thus he also missed the second battle of the war, a poor record for the British military commander, but rewarded by command of the much strengthened force mobilised to avenge the defeat!
News of the battle arrived in England on February 11th, at which point a force of 10,000 men was assembled for despatch to South Africa. More importantly, for the purposes of this article, geographical information was passed to Edward Stanford, one of the leading map-publishers in London at the period, and almost immediately incorporated on his map of Zululand.
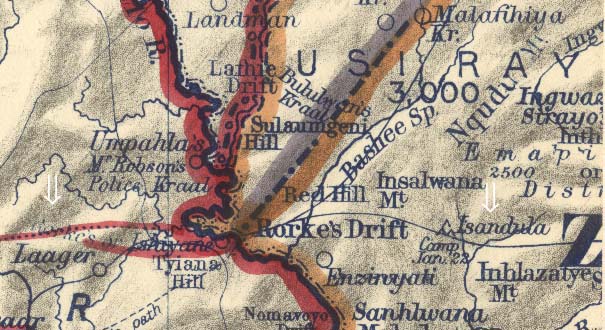
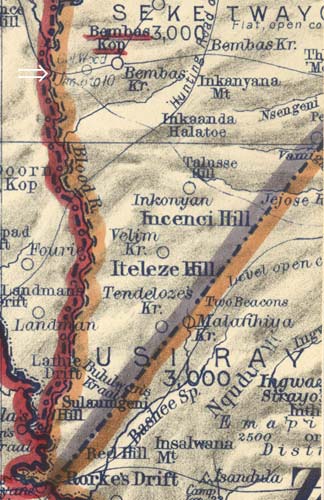
The principal additions made to the map are the insertion of the British camp at Isandhlwana (marked as Isandula, Detail 1) on January 22nd; the camp of the left hand column, led by Colonel Evelyn Wood, from January 6th to the 10th (although this was then partially erased, marked on Detail 2); and the fortified camp established by the right hand column at Eshowa (actually marked Ekhowa). In addition, Stanford took the opportunity to add a date to the imprint outside the lower border, all the better to emphasise how up-to-date the map was.
This information also allowed Stanford to correct an error in the map. Previously, Rorke’s Drift was marked in Natal (the original name is still evident, although partially erased, Detail 1), while now it is marked in its correct position in Zululand. The erased name can just be discerned in the second map, at left above the word ‘laager’.
Once these additions and corrections had been made, it would seem certain that this map was printed in very large numbers, to meet demand, both from the British Army for a map to use on campaign, but also from the British public to help them follow the military despatches in the daily papers. One could even imagine examples of the map being pinned up in school classrooms throughout the Empire, as an aid for pupils to follow the war, and learn a little history and geography at the same time.
Ephemeral items like this, printed to meet a particular demand, are among the rarest, and most interesting of all printed maps. Once the war was over, and the military energies of the Empire focussed elsewhere, such maps were all too often thrown away, and are most infrequently encountered by the modern dealer or collector.
This is the only example of this map encountered by Graham Franks in twenty years dealing. The other example examined, in the British Library, is a later state, retaining the imprint (as above), but with the first ‘Rorke’s Drift’ completely erased, crossed swords inserted at Isandhlwana (now ‘Isandala’) and the date there erased. The reference to Colonel Wood’s position has also been completely erased. These corrections must have been made very shortly after March 4th, because the British Library’s copy was received, and an accession stamp dutifully applied, on March 13th 1879.
Once these additions and corrections had been made, it would seem certain that this map was printed in very large numbers, to meet demand, both from the British Army for a map to use on campaign, and from the British public to help them follow the military despatches in the daily papers. One could even imagine examples of the map being pinned up in school classrooms throughout the Empire, as an aid for pupils to follow the war, and learn a little history and geography at the same time.
Ephemeral items like this, printed to meet a particular demand, are among the rarest, and most interesting of all printed maps. Once the war was over, and the military energies of the Empire focussed elsewhere, such maps were all too often thrown away, and are most infrequently encountered by the modern dealer or collector.
Reproduced by courtesy of Graham Franks, of J.A.L. Franks Ltd.